Saturday, September 10, 2011

Dynamically show/hide selection screen elements

TABLES: mara.

PARAMETERS: p_901 RADIOBUTTON GROUP rad1 DEFAULT 'X' USER-COMMAND usr,
            p_948 RADIOBUTTON GROUP rad1.

SELECTION-SCREEN BEGIN OF BLOCK b1 WITH FRAME TITLE text-001.
SELECT-OPTIONS : s_matnr FOR mara-matnr MODIF ID m1,
                 s_maktl FOR mara-matkl MODIF ID m2.
SELECTION-SCREEN: END OF BLOCK b1.

AT SELECTION-SCREEN OUTPUT.
  LOOP AT SCREEN.
    IF p_901 = 'X'.
      IF screen-group1 = 'M2'.
        screen-active = 0.
      ENDIF.
      MODIFY SCREEN.
    ELSEIF p_948 = 'X'.
      IF screen-group1 = 'M1'.
        screen-active = 0.
      ENDIF.
      MODIFY SCREEN.
    ENDIF.
  ENDLOOP.

Sunday, June 19, 2011

How to get material revision level

To get material revision level use the function module "REVISION_LEVEL_SELECT".

See the below sample code.

    CALL FUNCTION 'REVISION_LEVEL_SELECT'
      EXPORTING
        aeobj              = '4'
        datuv              = sy-datum
        matnr              = wa_po-matnr
      IMPORTING
        arevlv             = wa_out-revlm
      EXCEPTIONS
        date_not_found     = 1
        ecn_not_found      = 2
        ecn_no_revision    = 3
        input_incomplete   = 4
        input_inconsistent = 5
        revision_not_found = 6
        version_not_found  = 7
        OTHERS             = 8.
    IF sy-subrc <> 0.
* MESSAGE ID SY-MSGID TYPE SY-MSGTY NUMBER SY-MSGNO
*         WITH SY-MSGV1 SY-MSGV2 SY-MSGV3 SY-MSGV4.
    ENDIF.


Object 4 means for material. You need to pass the date, revision level on date. If you don't pass date you will not get results.

Friday, May 27, 2011

How to get batch characterstics

Combine 18 character material and 10 character batch into OBJEK.
Now pass this OBJEK to table INOB.
pass KLART as '023' - batch
pass OBTAB as 'MCH1'
Now go to AUSP.
Pass the CUOBJ field from the INOB table to OBJEK field.
Here you will get all the characterstics value.
You can get your desired characterstics.
Below is the code for the same.


REPORT  zbatch_characterstics.

TYPES: BEGIN OF d_ausp,
       atinn TYPE ausp-atinn,
       atwrt TYPE ausp-atwrt,
      END OF d_ausp.

DATA: w_matnr TYPE mara-matnr,
      w_charg TYPE lips-charg,
      w_key   TYPE ausp-objek,
      w_cuobj TYPE inob-cuobj,
      w_vinin TYPE ausp-atinn.

DATA: it_ausp TYPE TABLE OF d_ausp.

DATA: wa_ausp TYPE d_ausp.

CALL FUNCTION 'CONVERSION_EXIT_MATN1_INPUT'
  EXPORTING
    input        = w_matnr
  IMPORTING
    output       = w_matnr
  EXCEPTIONS
    length_error = 1
    OTHERS       = 2.
IF sy-subrc <> 0.
* MESSAGE ID SY-MSGID TYPE SY-MSGTY NUMBER SY-MSGNO
*         WITH SY-MSGV1 SY-MSGV2 SY-MSGV3 SY-MSGV4.
ENDIF.

CALL FUNCTION 'CONVERSION_EXIT_AUFNR_INPUT'
  EXPORTING
    input  = w_charg
  IMPORTING
    output = w_charg.

CONCATENATE w_matnr w_charg INTO w_key.

SELECT SINGLE cuobj
  FROM inob
  INTO w_cuobj
  WHERE klart = '023'
  AND   obtab = 'MCH1'
  AND   objek = w_key.

SELECT atinn atwrt
  FROM ausp
  INTO TABLE it_ausp
  WHERE objek = w_cuobj.

SELECT SINGLE atinn
  INTO w_vinin
  FROM cabn
  WHERE atnam = 'VEHICLE_VIN'.

READ TABLE it_ausp INTO wa_ausp WITH KEY atinn = w_vinin.

** How to get material batch characterstics in sap

Friday, May 20, 2011

Removing Duplicates in Excel Using Advanced Filter


  • Select the entire table from where you want to remove duplicates.
  • Now sort the table with the column for which you want to compare for duplicate entries.
  • Select the entire table again and click on advanced filter.
  • Select radio button "Copy to another location".
  • List range will automatically populate according to your selection.
  • Place the cursor on the copy to; and select a cell where you want unique entries to come.
  • Now select the check box "Unique records only" and then press ok.

Friday, May 13, 2011

SE16 V/S SE16N

SE16: SE16 is a data browser and it is used to view the contents of the table and we cannot change or append new fields to the existing structure of the table as we cannot view the structure level display using the SE16.

SE16N: The transaction code SE16N (general table display) is an improved version of the old data browser (SE16).

** Once you have entered your table name, type "&SAP_EDIT" without the quotation marks into the transaction code. This enables editing functionality on SE16N and allows you to make table changes. This allows you to access both configuration and data tables which may be otherwise locked in a production environment.
***** Caution *****

Features of SE16N:
The new transaction has a number of advantages over SE16.
  • You no longer have a maximum of 40 fields to select in the output.
  • There are fewer steps involved in executing a number of functions, whether it be outputting the results, maintaining the values in a table etc.
  • Exporting the data into Excel is far easier and quicker.
  • ALV functionality is available as standard.
  • The user is not restricted by having a maximum width of 1023 saved as a default in the user settings.
  • You can directly edit custom table entries which are maintainable from SM30.
  • Enhanced and user friendly user interface and more options.
Difference between se16 and se16n

Wednesday, May 11, 2011

How to lock your PC using mouse

Its a general tendency to lock your computer/laptop using Alt+Ctrl+Del or Windows+L. Did you know that you can lock your system using mouse also. Follow steps and create shortcuts which can be used to lock your computer.

Right click on an empty spot on the desktop
Go  to ‘New’ and select ‘Shortcut’
In the ‘Create Shortcut’ dialog box, copy-paste the following under ‘Type the location’: "rundll32 user32.dll,LockWorkStation"
Click ‘Next’
In ‘Type a name for this shortcut’, give a name ‘Lock’ or a name your wish and click ‘Finish’

Now simple double click on the shortcut you created to lock your compute.

Saturday, April 23, 2011

Vlookup on multiple columns

First read article on simple vlookup in Excel

Many times there is need to compare two columns from the lookup table. Consider a table which contains employee data of different companies. Employee number would be unique to company, so we need to match company as well as empoyee number to get the designation.


Here you need to concatenate the key columns in the lookup table and form another column. Also for lookup value we have to concatenate company and emp no.
Formula for concatenate =CONCATENATE(A2,B2)


Now we need to lookup value for key column in the table.
Vlookup will look like this.

 =VLOOKUP(C2,'Emp Details'!$C$1:$F$9,4,0)
 Note: Table_array mentioned here starts from the column key and not from the column company and emp no. This is because vlookup always looks up for the value in the first column of the table array.
Final output excel will look like this.

Friday, April 22, 2011

How to do VLOOKUP in MS Excel

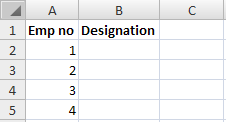
Here i will consider a simple database to look up values from. Considering employee details as an example. Currently considering only 4 fields and 4 values, there may be case where there are hundreds of records when you actually need to do VLOOKUP.


Suppose there is another sheet where you want designation in second column against the employee number.


Select the cell where you want to write the vlookup i.e. where you want the designation and click on the insert function button. Here i suggest that if you are new to formulas, use this to create or edit formulas rather than writing everything.


Select vlookup. A pop will appear for your inputs. There are four fields that you need to input amongst which 3 are mandatory and 1 is optional.


Lookup_value is nothing but the value you want to find in the database. It can be a value, reference or a string. Here in our case we need to lookup for employee no. We will give reference of A2.

Table_array is nothing but the table you want to lookup in. Here you need to make sure that your table is sorted by your first column and your first column is the field that you want to lookup for. i.e. in our case the table should be sorted by employee no and should be the first column in our table.
Also to make sure the table reference does not change when we copy our formula to other location, just press F4 once after selecting the table.

Col_index_num is nothing but the column number that you want to get back into the current cell when a match is found.

Range lookup can have two values 0(false) or 1(true). 0 means exact match should be returned in vlookup or 1 means match should be approximate.


Press ok and you will see the value in your cell.


Since we need to get values for all the rows, we need to have similar formular in all cells. We will not write the formula again but simply copy the cell and paste in all the other cells.


Final Formula: =VLOOKUP(A2,'Emp Details'!$A$1:$D$5,4,0)

Tip: While writing a formula the fields that look bold are mandatory and the one which is not bold is optional.


Simple vlookup.
vlookup help

Wednesday, April 6, 2011

Debugging A Background (Batch) Job In SAP

Very often we come across the situation where we have to debug a report or a particular transaction which is run in background (Batch job). Debugging and analyzing the same when a job is scheduled cannot be done by conventional way. Follow the below steps to debug for a background job. Here we will take an example of a custom report, schedule a job & debug the same.

è  Enter the custom transaction.
è  Enter all required fields on the selection screen.
è  Press F9 directly or Go to program and click Execute in Background


è  A popup screen will appear, press ok once.


è  A screen will appear asking for start time.


è  Click on Date/Time and enter near future date and time. Note that this time should be relative to SAP system time and not your desktop system time. Then press save button.


è  Information message will pop up saying background job has been scheduled.


è  Now go to transaction SM37 (Background Job)
è  Select your job and in the command box type JDBG (Note you only need to type JDBG and no /n or /o)


è  And your debugging will start up as soon as you press enter. (You might have to press F7 to reach to the start of your report)

Pop Up To Select Radiobuttion Dynamic Function Module

Here you need to create a custom function module to get pop up to select radiobuttons.
Here in below function module I have put facility for 6 radiobuttons. Depending on the texts entered radiobuttons will show up.

Import parameters:

Export parameters:


GUI Status 5100:


GUI Title 51:


Sunday, April 3, 2011

Visual Basic Editor Shortcut MS Excel 2007

When editing macros or when you are working with VBA code and creating forms in MS excel, you have to navigate to the Visual Basic Editor too often. Follow the simple steps below to add Visual Basic Editor as shortcut to quick access toolbar in MS excel.
è  Click on office button.


è  Click Excel options right at end of the menu on right side.

 
è  Click on customize
è  From choose commands drop down select developers tab


è  Select Visual Basic and Click on add button.


è  Finally press ok to close the options.


Note: Alternatively you can also use shortcut key as ALT+F11 to start Visual Basic Editor.

Comments in HTML

Often we come across situation while writing blogs where we need to add comments. Many times you just need to add the snippets from other different sites in the same template you created. But the confusion comes that how do i distinguish between codes if i refer in future and need to change / add or remove something.

Answer to this is simply adding comments in the HTML code that you add. Next question that comes is how to do this. This is pretty simple, you just need to add a comment link with open tag as <!--  and close tag as -->. Anything writen between this would be considered as comments.

For example: <!-- Code for google analytics -->
The above comment line gives me an information that i had added the code for google analytics.
Just add the above line and write your own comments, the way you can understand in furture.

Saturday, April 2, 2011

Fixing Error Internet Explorer cannot open the Internet site

Internet Explorer cannot open the Internet site <site name>
Operation Aborted.


Did you encounter this message then go ahead and read the article to fix this.

You need to change you internet security settings to avoid getting this message.
è  Go to tools
è  Open Internet Options
è  Click on security tab
è  Click on custom level
è  Disable “Active Scripting”


è  Disable “Scripting of Java Applets”


Note: This will disable some of the features of the website to you. Alternatively you can open the webpage in other browsers such as Chrome or Firefox. You will not get an error. You can inform the site administrator for such an error for them to fix this permanently.

Internet Explorer Keyboard Shortcuts


Below are the keyboard shortcuts that really help navigating through internet explorer while browsing.

ALT+D
Cursor moves to the address bar & you can continue typing the new address.
CTRL+E
Cursor moves to the search box & you can continue search with your default browser.
F11
View internet explorer  in full screen
ALT+HOME
Go to your Homepage
CTRL+TAB
Switch between different tabs
CTRL+F
Find on the page
F5
Refresh the webpage
ESC
Stop loading the page
CTRL+N
Open a new window
CTRL+W
Close the current tab
CTRL+S
Save the current webpage
CTRL+I
Open favorites box
CTRL+H
Open History box
CTRL+T
Open new tab


These are the general shortcuts that i have been using. Please comment if you have used any other shortcuts than mentioned above. 

Thursday, March 31, 2011

Convert SQVI Quick Views to SQ01 Queries

Quickviewer in transaction SQVI:


1.      To enable convert quick viewer
è     Transaction SQ01
è     Go Environment
è     Query Areas


è     select standard area (client-specific)
è     choose


2.      Create a user group
è     Go to transaction SQ03


è     Create new user group and assign users.


3.      Converting quick viewer to query
è     Go to SQ01
è     Query
è     Convert Quickview

* Make sure the queries of the user group you created are being displayed in the query list in SQ01 transaction, because it will automatically pick up the user group.
* If not go to SQ03 and display your user group and come back to SQ01 transaction.


è     select your quickview
è     Now input intended query name & infoset name.


Note: Since SQVI quick views are client specific, when we follow above steps and convert to SQ01 queries it would be client specific and would need to transport to access from other clients using report RSAQR3TR.

4.      Assigning transaction to Query:
è     Go to transaction SE93
è     Create parameter transaction
è     Transaction = START_REPORT
è     Select skip first screen checkbox
è     In default values give the below details:
D_SREPOVARI-REPORTTYPE = AQ
D_SREPOVARI-EXTDREPORT = <Name of the Query>
D_SREPOVARI-REPORT = <User Group>