- Select the entire table from where you want to remove duplicates.
- Now sort the table with the column for which you want to compare for duplicate entries.
- Select the entire table again and click on advanced filter.
- Select radio button "Copy to another location".
- List range will automatically populate according to your selection.
- Place the cursor on the copy to; and select a cell where you want unique entries to come.
- Now select the check box "Unique records only" and then press ok.
Showing posts with label MS Excel. Show all posts
Showing posts with label MS Excel. Show all posts
Friday, May 20, 2011
Removing Duplicates in Excel Using Advanced Filter


Saturday, April 23, 2011
Vlookup on multiple columns
First read article on simple vlookup in Excel
Many times there is need to compare two columns from the lookup table. Consider a table which contains employee data of different companies. Employee number would be unique to company, so we need to match company as well as empoyee number to get the designation.

Here you need to concatenate the key columns in the lookup table and form another column. Also for lookup value we have to concatenate company and emp no.
Formula for concatenate =CONCATENATE(A2,B2)


Now we need to lookup value for key column in the table.
Vlookup will look like this.
 =VLOOKUP(C2,'Emp Details'!$C$1:$F$9,4,0)
Note: Table_array mentioned here starts from the column key and not from the column company and emp no. This is because vlookup always looks up for the value in the first column of the table array.
Final output excel will look like this.

Many times there is need to compare two columns from the lookup table. Consider a table which contains employee data of different companies. Employee number would be unique to company, so we need to match company as well as empoyee number to get the designation.
Here you need to concatenate the key columns in the lookup table and form another column. Also for lookup value we have to concatenate company and emp no.
Formula for concatenate =CONCATENATE(A2,B2)
Now we need to lookup value for key column in the table.
Vlookup will look like this.
Note: Table_array mentioned here starts from the column key and not from the column company and emp no. This is because vlookup always looks up for the value in the first column of the table array.
Final output excel will look like this.
Friday, April 22, 2011
How to do VLOOKUP in MS Excel
Here i will consider a simple database to look up values from. Considering employee details as an example. Currently considering only 4 fields and 4 values, there may be case where there are hundreds of records when you actually need to do VLOOKUP.

Suppose there is another sheet where you want designation in second column against the employee number.
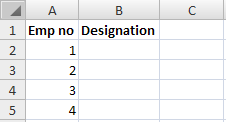
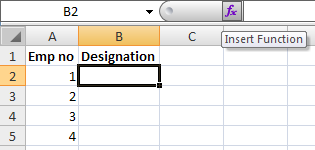
Select the cell where you want to write the vlookup i.e. where you want the designation and click on the insert function button. Here i suggest that if you are new to formulas, use this to create or edit formulas rather than writing everything.
Select vlookup. A pop will appear for your inputs. There are four fields that you need to input amongst which 3 are mandatory and 1 is optional.
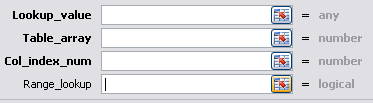
Lookup_value is nothing but the value you want to find in the database. It can be a value, reference or a string. Here in our case we need to lookup for employee no. We will give reference of A2.
Col_index_num is nothing but the column number that you want to get back into the current cell when a match is found.
Range lookup can have two values 0(false) or 1(true). 0 means exact match should be returned in vlookup or 1 means match should be approximate.
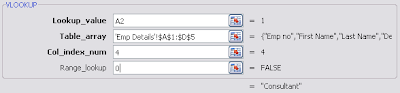
Press ok and you will see the value in your cell.
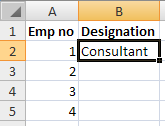
Since we need to get values for all the rows, we need to have similar formular in all cells. We will not write the formula again but simply copy the cell and paste in all the other cells.
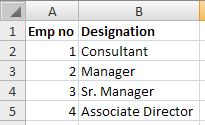
Final Formula: =VLOOKUP(A2,'Emp Details'!$A$1:$D$5,4,0)
Tip: While writing a formula the fields that look bold are mandatory and the one which is not bold is optional.
Simple vlookup.

Suppose there is another sheet where you want designation in second column against the employee number.
Select the cell where you want to write the vlookup i.e. where you want the designation and click on the insert function button. Here i suggest that if you are new to formulas, use this to create or edit formulas rather than writing everything.
Select vlookup. A pop will appear for your inputs. There are four fields that you need to input amongst which 3 are mandatory and 1 is optional.
Lookup_value is nothing but the value you want to find in the database. It can be a value, reference or a string. Here in our case we need to lookup for employee no. We will give reference of A2.
Table_array is nothing but the table you want to lookup in. Here you need to make sure that your table is sorted by your first column and your first column is the field that you want to lookup for. i.e. in our case the table should be sorted by employee no and should be the first column in our table.
Also to make sure the table reference does not change when we copy our formula to other location, just press F4 once after selecting the table.
Col_index_num is nothing but the column number that you want to get back into the current cell when a match is found.
Range lookup can have two values 0(false) or 1(true). 0 means exact match should be returned in vlookup or 1 means match should be approximate.
Press ok and you will see the value in your cell.
Since we need to get values for all the rows, we need to have similar formular in all cells. We will not write the formula again but simply copy the cell and paste in all the other cells.
Tip: While writing a formula the fields that look bold are mandatory and the one which is not bold is optional.
Simple vlookup.
vlookup help
Sunday, April 3, 2011
Visual Basic Editor Shortcut MS Excel 2007
When editing macros or when you are working with VBA code and creating forms in MS excel, you have to navigate to the Visual Basic Editor too often. Follow the simple steps below to add Visual Basic Editor as shortcut to quick access toolbar in MS excel.
è Click on office button.

è Click Excel options right at end of the menu on right side.


è Click on customize
è From choose commands drop down select developers tab


è Select Visual Basic and Click on add button.


è Finally press ok to close the options.

Note: Alternatively you can also use shortcut key as ALT+F11 to start Visual Basic Editor.
Tuesday, March 29, 2011
How to write rupee symbol in MS word or excel
è Download Rupee Foradian Font & unzip the above file.
è Double click on .ttf file to install the font and click on install or copy paste the location .ttf file in location C:\WINDOWS\Fonts
è Now open the word document.
è Select font as rupee foradian.


è Press keyboard key “~”. Enjoy the rupee symbol


Subscribe to:
Posts (Atom)